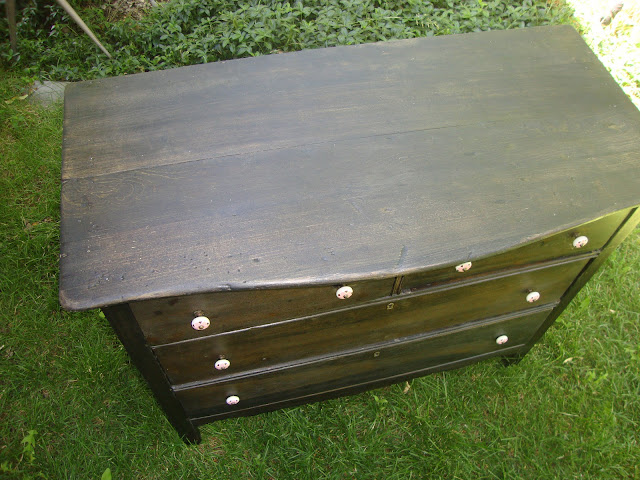
This was probably the most time consuming project ever. If at all possible do not attempt to strip and re-stain old beat-up furniture. But if you must, here is what were did and learned.
Being a blogging n00b I forgot/lost the before pictures but here is one to help you get an idea of what we were working with.
We found this treasure at a garage sale and talked them down to 15 dollars, right before a bunch of Pinterest college kids swooped in to try and take it. If anything, Pinterest has turned this town into a bunch of crazy people (myself included).
What originally attracted us were these awesome glass or maybe ceramic knobs.
The previous owners had covered this in a thick layer of awful latex canary yellow paint. You know that crappy paint job that makes it look slightly weathered? The dresser was very dinged up and there were deep grooves where it had, I assume, been dragged through Vietnam in the 50's then been assaulted by pygmies wielding machetes. I have never stripped furniture before and naively thought "how hard could it be?" and more appropriately "if I screw up it's a junky piece of furniture and I wont feel too bad."
Stripping:
Striping furniture is one of the worst things ever. Stripper comes in somewhat expensive cans and the best stuff we found has a jelly consistency and they all smell terrible. There are guides out there for which works best but in my experience they are all awful and it will be a terrible experience no matter what.
The first challenge is timing. You want to put on a VERY thick layer of primer because it evaporates very quickly. The payoff is you want it in a very ventilated place so you don't die, but the more open air the faster it dries.
If you wait too long it will get gummy, and the dissolved paint will actually soak deeper into the wood creating more work. Some have recommended covering it with tinfoil for 50 min, but I had little luck with this and it dried out much faster.
What worked best for me was globing on a thick layer then letting it sit for about 10 min. The paint will bubble up as it separates from the wood. Then using a sharp scrapper I was able to get giant sheets off at a time. The problem was I had to go back and pick out paint from all off the dings and cracks in the wood, and I had to go back over each area with medium and fine steel wool. It took days to finally get it all stripped.
Staining:
We wanted a darker stain, and I have had no experience with stain either. The most important thing we learned here is to treat all of the wood the same. I didn't sand all the parts evenly, and so they all stained at different rates and getting it all to match was terrible. We wanted a warm dark brown almost black color, and the parts that still had some of the old stain turned out great, but I had to sand and redo them :( The finished project ended up looking great though.
After everything it actually turned out alright!
We finished the drawers with some contact paper we got from the dollar store.
The final project looks awesome, even though it was a ton more work than anticipated, and certainly more expensive than I had hoped.
Cost:
Dresser - $15
Stripper - free (but total about $20)
Steel wool - free
Rubber gloves - free
Stain - $8
Contact Paper - 5 x $1


